
The Register
Every part of the spinet plays its part, of course, but the register is very much the heart of the instrument, around which everything else is made to fit.
The contruction of this important unit is fully covered in John Barnes' booklet, so these notes are complementary rather than a substitute.
The register of an English spinet is made up from a number of identical blocks, usually of walnut. In the Blunt spinet, there are 54 jacks arranged in pairs, which means that there are single strings (rather than one of a pair) for the extreme lowest and highest notes. Other spinets vary this pattern. So we have 27 blocks, each carrying two jacks.
It cannot be an accident that the blocks on the Blunt spinet (as on those by Stephen Keene) are exactly ½" thick. So we need some walnut prepared to this dimension; no doubt this was a task given to an apprentice. It is really important that we use well-seasoned wood for this job - we do not want the register to shrink and crack in the future. The good news is that we need short pieces - offcuts - of which we tend to accumulate plenty. It is convenient to make the blocks in pairs - i.e. 13½ pairs - but will make a few extra. Each block is about 2¾" long, so a pair needs a piece of wood (we can hardly call it a 'board' 5½" long or a bit more, let's call it 6" - it doesn't matter.
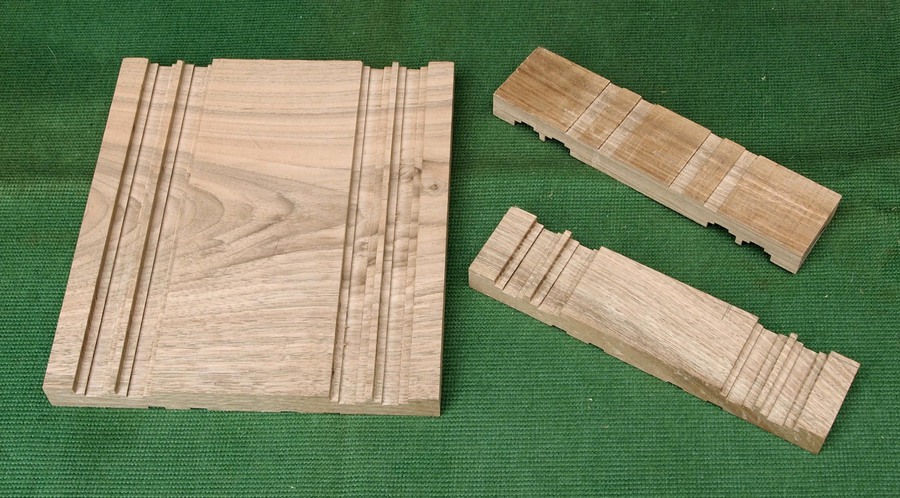
Now we need to make grooves to accommodate the jacks. There are several ways of doing this. Probably the original way (detailed in the booklet) was to use a tenon-saw with a depth-stop. A modern variation on this is to use a bandsaw with a stop. In either of these cases, it's easier and more accurate to cut a single block (as on the right of the picture above) - each block is 1¼" deep. There is a main groove for the jack - about 1/8" deep, and then a central narrower gap for the tongue-reliefs. And corresponding narrow grooves on the other side of the block, so that the slots end up in a sort of cruciform shape. After making the saw-cuts, the grooves are finished with a very sharp chisel.
However, if you have access to a router-table, there is a quicker and more accurate way. Use a ½" router bit for the main grooves, and a ¼" bit for the reliefs. The ends of the pieces serve as a datum, working from both ends. In this case, it is better to have a wider piece as seen on the left of the picture above, to work against the fence. The piece in the picture is nearly 6" wide, enough for four pairs of blocks, each of which will take two jacks - i.e. sixteen jack's-worth from this one piece!
The pieces are then sawn to 1¼" wide (if made by the router method) and the outer, datum, edges marked. Each double block may then be sawn in half. The exact length does not matter, as long as the datum edges are marked.
Now we need to make a jig, to assemble the blocks. This has an L-section, as seen in the picture below. The stop at the right-hand end is adjustable for angle in the first instance; then it may be fixed.

From the plan, the positions and angles of the first and last blocks should be marked on the jig. Then divide up the space between. For this spinet, 27 blocks divide neatly into 3 and 3 again. Now, with the stop set at the 'expected' angle, lay a group of three blocks snugly together. They should match the mark. If not, then by altering the angle of the stop slightly, they can be made to match. When this is done, fix the angle temporatily, and try the fit for a group of nine. Adjust if necessary, and now fix the stop. (There is some advantage in marking and making the narrow relief grooves on the 'back' of the blocks at this stage, to ensure that they are central to the main grooves.)
Now glue up a group of three, push snugly into the corner, and let the glue set. Repeat for two more groups of three, and then try the three threes together. Some small adjustment is even possible at this stage, but we will see later that the exact length does not matter, as the keyboard will be cut later to match the register. We want it to be fairly good, though, and I was within 2 mm after the full set of 27.
The three threes may now be glued together. Add the remaining blocks in groups of three, but always adding to the stop end - at the right in the above picture. The longer section may be pushed to the left, and connected as we go.

The completed assembly will look like this (above). Complete the top-left and bottom-right corners with extra blocks.
The datum edges (away from you in this picture) have been fitted to the jig, so will form a straight line. If you are using a circular saw, a fine-finish blade is best for this next bit. Or a bandsaw is good. Using this edge against the fence, trim the first edge. Then reverse the block to complete - as seen below.

It is important that the jacks, although closely fitted, should not jam in the register. John Barnes' booklet suggests that the edge of the register-block against the wrestplank should be finished at a slight angle, 2°, so that the jacks lean slightly towards the player. This allows for the fact that the key-lever does not move directly upwards, but in an arc of rotation. This slight angle is good practice, and has been incorporated into this replica, but we should record that it is not a feature of the Blunt original. However, John's commentary is based on a study of the c.1711 Keene & Brackley spinet.